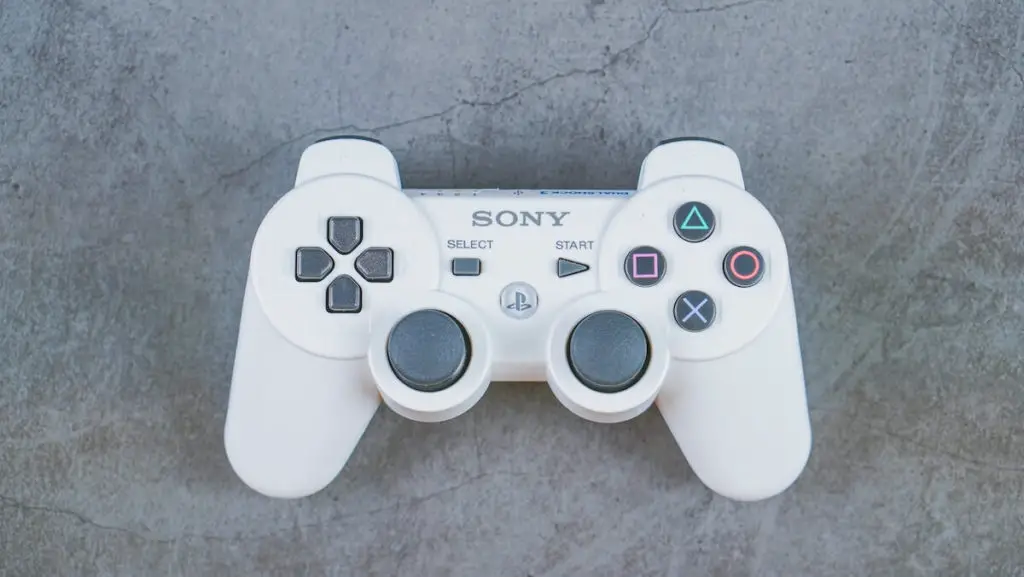
Sony’s PS3 controller aka the DualShock 3, isn’t one of those nice guys when it comes to connecting it seamlessly to a PC. There’re a plethora of other third-party controllers out there, however, the PS3 console still holds a special spot in the heart of every gaming enthusiast.
The pressure-sensitive buttons of the console are what make a PlayStation controller so special among all others. The PS3 controller is by far the best choice for playing emulated PlayStation games via your PCSX2 emulator on your Windows PC.
Is it possible to connect PS3 controllers to a PC?
The short answer is YES!
However, the process of connecting PS3 controllers to a Windows PC is not that straightforward. PS3 controller may seem like a plug n’ play kind of peripheral just like your keyboard or a mouse, but the reality is much more than meets the eye.
Having said that, we have done all the legwork and curated the most possible less complicated method of connecting your PlayStation wireless controller to your Windows PC. Keep scrolling to know how.
Methods to connect a PS3 Controller to a PC:
- Connect the PS3 Controller through a mini-USB cable
- Connect the PS3 Controller wirelessly (Bluetooth)
What are you going to need:
Hardware:
- PS3 Controller (DualShock 3)
- Mini-USB cable (PS3 Charging cable)
- Bluetooth dongle (not required for laptops with built-in Bluetooth)
Software:
The software mentioned below is necessary for the PS3 Controller to work successfully on your PC.
While you may have such software already installed on your PC, downloading and installing these will make sure that you face no issues with setting up the DualShock 3 for your PC. If you do not wish to waste your time reinstalling, make sure that you have these. In case you are not aware, just download and try to install. While installing, your PC will automatically tell you that the software is already installed. You can skip the installation in such a case.
Mentioned below are the two ways you can connect a PS3 controller.
#1 – Connect the PS3 Controller through a mini-USB cable
First things first, you need to ensure that your DualShock 3 isn’t connected to your PlayStation’s new console. Check if you have paired your DualShock 3 before. We recommend you unplug your console from its power source. This will ensure no hindrance to the PS3 controller connection to your Windows computer.
Once done, consider the steps below-
Step 1: First thing first, plug your PS3 controller into your computer. Use a mini USB cable for this!
Step 2: Turn on your PS3 controller. Long press on the stylized ‘PS or PlayStation button’, located in the middle of your controller.
Step 3: Head on to the Scp toolkit website. The Scp toolkit program will provide an interface, which helps your PS3 controller to sync to your computer via a stable connection, along with game services such as steam. You can thus connect your PS3 controller easily to your device.
Note that a Windows 7 user must download the drivers for the Xbox 360 controller. The Xbox controller is essential for Windows 7 systems.
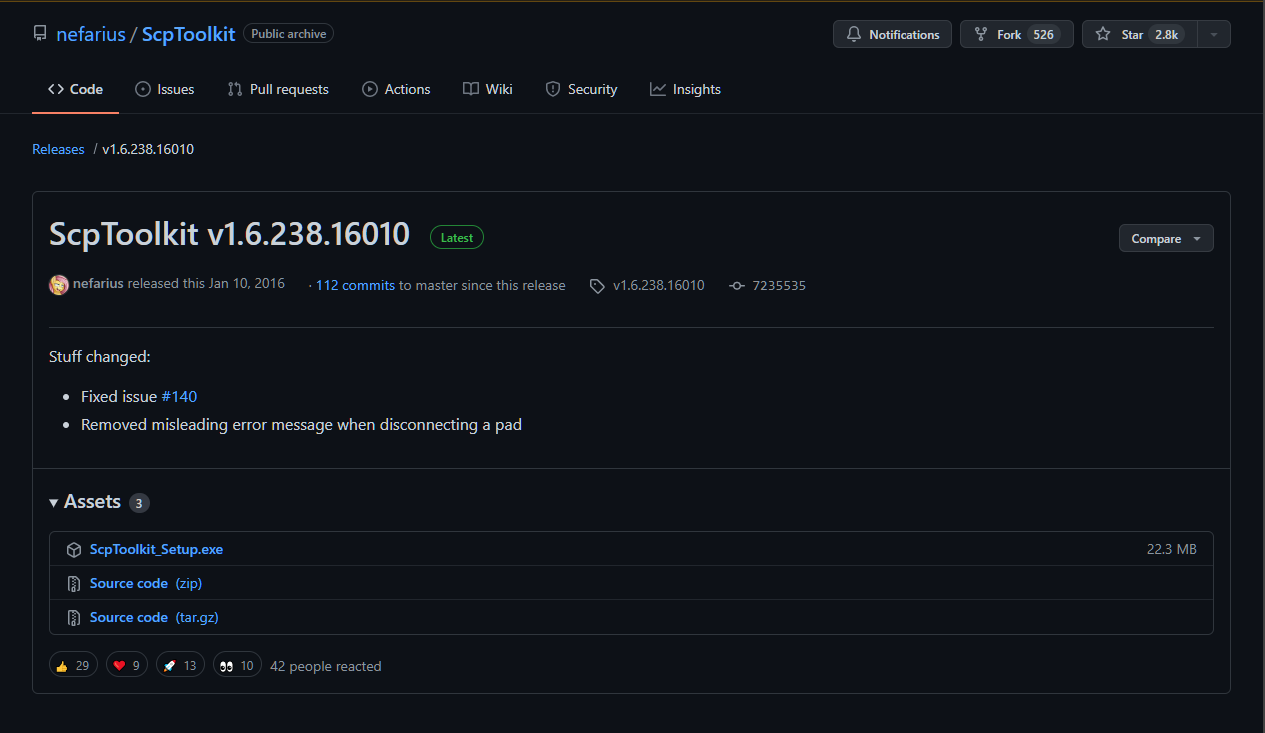
Step 4: Under assets, you will find the setup link labeled as “ScpToolkit_Setup.exe”. Click on it. (refer to the snippet below) Once you click on it, you will get the download prompt- click on download and save it to your computer’s download folder.
NOTE: Make sure you download the latest version of the Scp toolkit
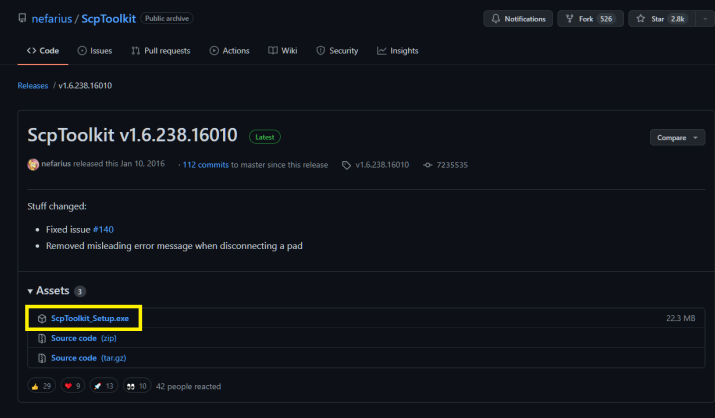
Step 5: Now, either double click or right-click > Open to launch the toolkit setup file. You may also access this .exe file (the icon resembles a full blackout PS3 controller) by heading on to your default downloads folder of your computer.

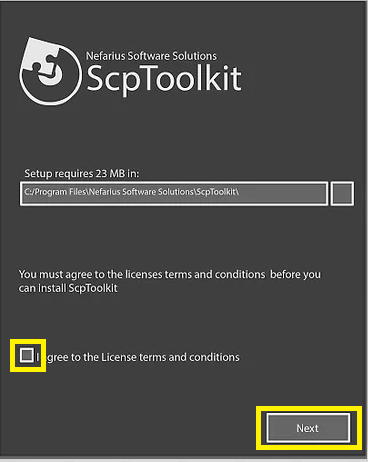
Step 6: Then, we need to install Scptoolkit. Before you could install it, you will be prompted with a message if your PC is missing out on any prerequisites needed to run this toolkit. In that case, click on Next and follow the prompts. Otherwise, consider the below-mentioned steps:
Select the checkbox to accept the license terms & conditions.
Click on the Next button below.
Click install to begin installing it.
When prompted, choose YES and press Enter.
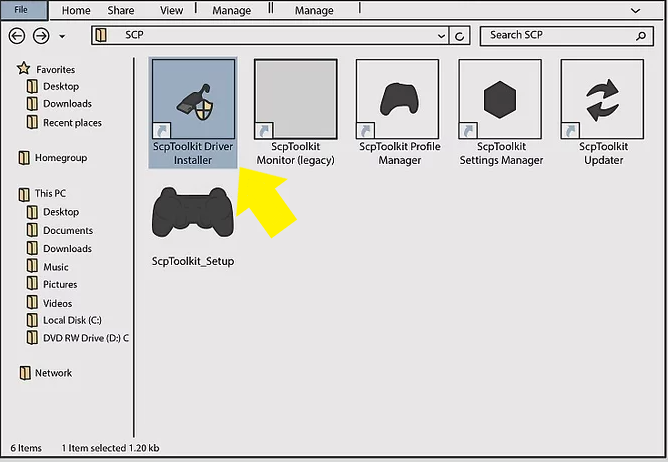
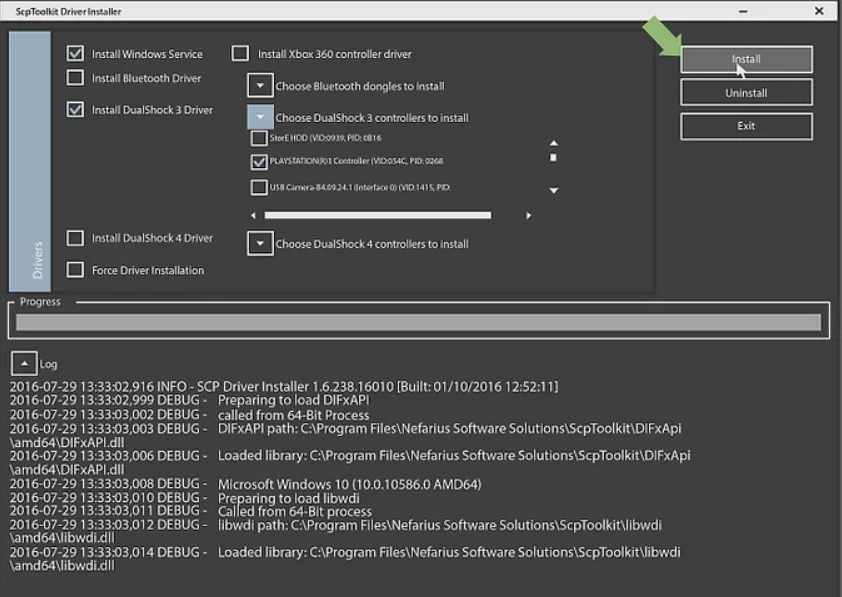
Step 7: Inside the file where you have installed the SCP toolkit, you will find the SCPtoolkit driver installer that has an icon of a USB cable. Double click to initiate it.
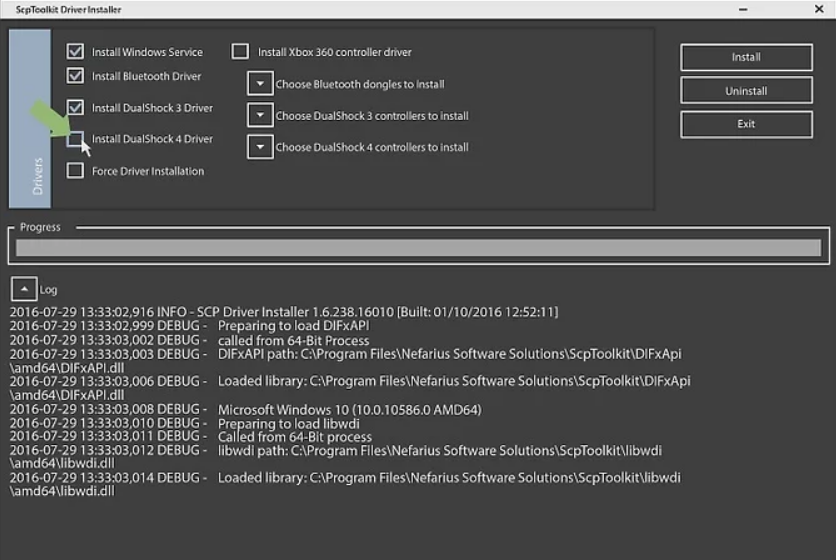
Step 8: You will find a checkbox against the Install DualShock 4 Controller option on the screen. You need to uncheck the option for installing DualShock 4 controller. You can locate it on the left side in the driver installer window. By unchecking it, you simply mean that you don’t wish to download the PS4 drivers on your Windows computer. Installing only the ones for PlayStation 3 will do for you.
For users who don’t use dongles, they need to uncheck the option for Bluetooth too. This is because they may not have wireless controllers. Instead of a wireless controller, their PS3 controller is wired. In a nutshell, we recommend you to uncheck any option that you know won’t be of use to you.
Again, for users of Windows Vista systems, there is an option for ‘Force Driver Installation’. You can locate it around the middle of the driver installer window.
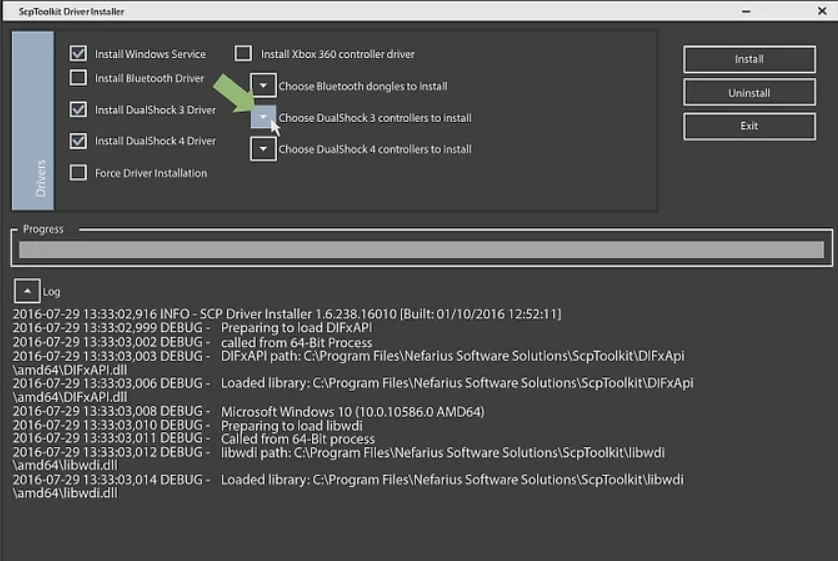
Step 9: You will find an option namely Choose DualShock 3 Controllers to Install in the driver installer window. It is located towards the right part of the window. You can choose your controller from the option. To do so, select the box underneath the option.
Step 10: Under the option to select your controller, you will see a wireless controller option. Check the box against it. The screen will show devices that are connected to your personal computer. You can recognize the PlayStation 3 controller by locating the wireless controller option. The USB port to which the PS3 controller is connected will also be mentioned beside it.
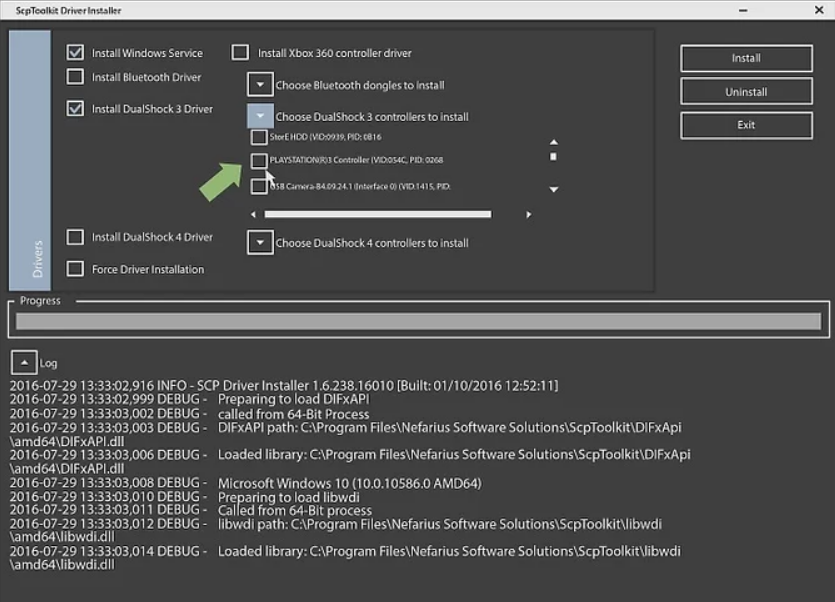
Step 11: Finally, select the Install option present on the right side of the driver installer window. By default, the Toolkit will download the drivers of your PS3 controller on your system. Wait for the installation process to get over. It might take a few minutes. Upon completion, you will hear a sound to be assured of the same. Thus, you are ready to use a PS3 controller now that the drivers are downloaded to your system.
#2 – Connect the PS3 Controller wirelessly (Bluetooth)
You also have the alternative to connect your PS3 controller wirelessly. You can connect your PlayStation 3 controller without the need for a USB device. A wireless connection can be made possible via Bluetooth. All you need is a Bluetooth-enabled device like a dongle for a Bluetooth connection. Follow the steps below to know everything you need about how to connect a PlayStation 3 controller without a cord.
Step 1: Locate the specific folder, e.g. a Zadig folder, on your system.
Step 2: Go to Device.
Step 3: Select Load Preset Device.
Step 4: Now, double click where you see Bluetooth.cfg.
Step 5: You have to find your dongle from a list of many devices. For this, go to Options. Select List All Devices.
Step 6: Select the USB dongle you are using from the list of devices.
Step 7: Go to the settings for Bluetooth and Other Bluetooth devices. Now, go to Device and Printers under the list of Bluetooth devices. It is present under Related Settings. The related settings are available on the right side. Select your dongle to pair the PlayStation 3 controller with. It is always safe to use your USB dongle only to pair your controller if you want to avoid unnecessary hassles to pair your controller without a USB cable.
Step 8: Select Replace Driver.
Step 9: Find the host address. Upon saving the controller you have decided to pair your USB dongle with, the system will show a host address.
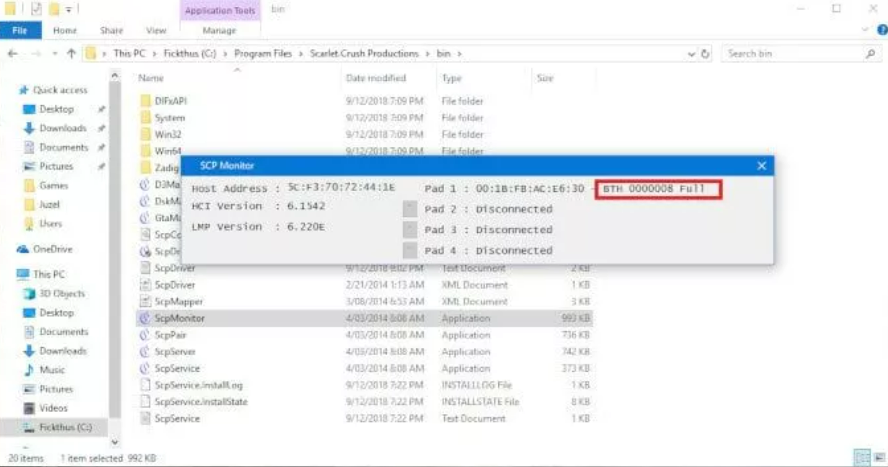
Step 10: Finally, you are all set to go. Remember to disconnect the USB cable from your controller before you connect your controller without the USB cable. You must unplug the cable to connect your PlayStation 3 controller without it.
It might happen that the system does not detect your PlayStation 3 controller when you pair it. No worries, it happens in a few cases. Just unplug the PlayStation 3 controller and plug and re-pair it again after waiting for a few seconds (at least two seconds). Once it works, you will see BTH instead of USB.
To know in detail, you can check out the section for Calibrating and Ensuring It’s Connected. Here, in this section, you can manually check for yourself whether you have successfully been able to connect your controller with your computer via Bluetooth.
We would like to highlight that although you can choose any of the above methods to connect your controller, a Bluetooth connection is more hassle-free for obvious reasons. Petty issues like a small hole in your USB cable are most likely to arise in the case of a wired connection.
Final Words
So, here’s your simple guide to connecting your controller with your computer. You may connect it via wired USB connections or an easier wireless connection via Bluetooth. All you are required to do is implement the steps properly, and you are good to go! You are ready for a good play now that you can connect the controller with your system. Happy gaming!
