
Once you get the hang of it, taking screenshots on your devices can be really easy! It’s really easy to capture your screen if you have an iPhone or iPad. Nevertheless, the procedure may differ significantly according to the brand of your particular gadget. The screenshot capability is available to Apple Watch owners. However, it may not be immediately apparent.
With their sleek looks and simple interfaces, Apple’s iPad and iPhone have transformed the way we engage with technology. These technologies blend into our lives, allowing us to easily record and share the world around us.
This article will walk you through the simple process of taking screenshots on the iPad and iPhone, allowing you to immortalize your digital experiences in a matter of seconds. We now have a special guide on how to take screenshots in macOS if you’re using a Mac. But let’s concentrate on how to take a screenshot on your iPad or iPhone in particular.
Screenshot on iPad: A Tale of Two Methods
Capturing screenshots on an iPad is like unlocking a treasure trove of methods tailored to your device’s design. Depending on whether your iPad features Face ID or Touch ID, there are different techniques you can use to snap that perfect screenshot.
Method 1: For iPads with Face ID:
You can use Face ID to snap a screenshot on an iPad.
- Hold your iPad vertically.
- At the same moment, press and release the Top (Sleep/Wake) and Volume Up buttons.
- In the lower-left corner of your screen, a thumbnail of the screenshot will show.
- Swipe left to dismiss the screenshot or tap the thumbnail to view it.
- Using the thumbnail, you may modify or share the screenshot.

Check your settings to see if your Screenshots folder is being backed up to your iCloud account.
Method 2: For iPads with Touch ID:
To take a screenshot on an iPad with Touch ID, do the following:
- At the same moment, press and release the Home and Top buttons.
- In the bottom left corner of your screen, a thumbnail of the screenshot will show.
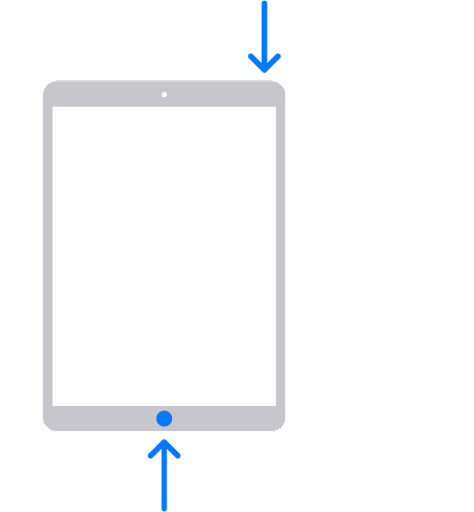
- Swipe left to dismiss the screenshot or tap the thumbnail to view it.
You can also try the following steps:
- Keep the Power button pressed.
- At the same moment, press the Home button.
- You will hear a camera shutter and see a “flash” on the screen if your sound is turned on.
- Tap the snapshot preview in the bottom left corner of your screen.
You can find your screenshots in the camera roll in the photo app.
The process for taking a screenshot on an iPad varies based on your model. For example, on the 2018 iPad Pro, you need to press the power and volume-up buttons at the same time.
Method 3: Using AssistiveTouch:
- Here’s a nifty alternative for a more personalized experience.
- Go to Settings > Accessibility > Touch > AssistiveTouch. Turn on AssistiveTouch, and voila! A customizable button appears on your screen.
- Set it to include the Screenshot action, then tap the AssistiveTouch button and select Screenshot whenever you’re ready to capture your screen.
Some additional points to assist users:
- AssistiveTouch Customization: You can personalize the AssistiveTouch button beyond just taking screenshots. It’s a versatile tool that offers various functionalities beyond capturing screens.
- Flexibility for Preferences: These methods cater to different preferences and accessibility needs. Whether you prefer physical button combinations or a more accessible on-screen option, the iPad has you covered.
Unlock the power of screenshots on your iPad and make the most out of its capabilities! Stay tuned for more tech tips and tricks right here.
Screenshot on the iPhone: A Straightforward Approach
Capturing screenshots on your iPhone is a piece of cake! Here’s the step-by-step breakdown to capture that perfect moment on your device:
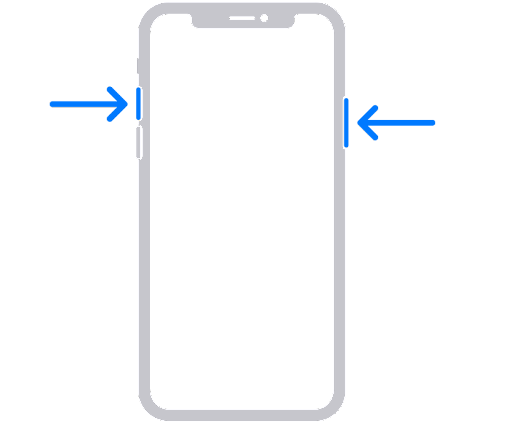
The Simple Steps:
- Start by pressing and holding the side button (or the power button, as some may call it).
- While keeping the side button pressed, simultaneously press the volume up button.
- Now, release both buttons at the same time. Keep an eye out for a thumbnail that flashes momentarily in the lower-left corner of your screen—this confirms your successful screenshot!
Editing and Sharing – Adding Your Personal Touch:
- Once you’ve captured your screenshot, the possibilities are endless! Tap the thumbnail to open the screenshot preview.
- Here comes the fun part—edit and personalize your screenshot using the various editing tools available. Crop it, add annotations, or apply filters—make it uniquely yours!
- When you’re satisfied with your masterpiece, hit the Share button. This opens up a world of options—you can effortlessly share your screenshot via messages, email, and social media platforms, or even store it in the cloud for safekeeping.
Unlock the potential of your iPhone’s screenshots and let your creativity flow! Stay tuned for more tips and tricks right here.
Don’t worry about button combinations if you don’t want to
If tapping many buttons at the same time seems difficult, don’t worry! Apple’s AssistiveTouch function is come to save the day and make snapping screenshots on your Apple iPhone easier.
Here’s how to enable AssistiveTouch:
- Open Settings and Navigate to AssistiveTouch:
- Go to Settings > General > Accessibility > Touch > AssistiveTouch. Tap the button at the top of the screen to activate AssistiveTouch.
- Activate AssistiveTouch via Siri:
- If you prefer Siri’s assistance, simply say, ‘Turn on AssistiveTouch,’ and it’ll do the job for you.
Once AssistiveTouch is activated, here’s how to capture a screenshot:
- Using Default Settings:
- Tap the AssistiveTouch button on your screen, then go to Device > More > Screenshot. This will trigger the screenshot function using the default settings.
- Customizing Actions for Ease:
- Want to streamline the process even more? Customize one of the actions (Single-Tap, Double-Tap, or Long Press) within the AssistiveTouch settings. Set it to take a screenshot by selecting the respective menu. Then, whenever you perform that action, the screenshot will be taken seamlessly.
Whatever technique you use, you’ll see the familiar screen flash, signaling that the screenshot has been recorded. And voila! Your new screenshot will be nicely stored in your photo library.
Say goodbye to button combinations and hello to the ease of AssistiveTouch on your Apple iPhone for seamless screenshotting. Keep checking back for more tech news.
(Video Tutorial) How to take a screenshot on iPad or iPhone
Wrapping Up
Capturing and sharing events has become an essential aspect of our lives in today’s fast-paced digital environment. Knowing how to capture a screenshot on your iPad or iPhone may be extremely useful whether you want to save crucial information, share an amusing meme, or retain a record of a discussion.
We’ve covered various methods tailored to different Apple devices:
- iPad with Face ID: Swiftly press the Top (Sleep/Wake) button and Volume Up button.
- iPad with Touch ID: Simultaneously pressing the Top (Sleep/Wake) and Home buttons.
- iPad or iPhone with AssistiveTouch: Enabling AssistiveTouch for a more accessible screenshot process.
Capturing a screenshot on an iPhone is as simple as tapping the Side and Volume Up buttons at the same time.
We also spoke about the editing and sharing options available once you’ve grabbed your screenshot. These tools provide customization and ease, from cropping and annotating to sharing via numerous platforms or saving in iCloud.
Finally, we emphasized the AssistiveTouch function, which offers an alternative approach for individuals who do not wish to employ button combinations. By enabling AssistiveTouch, users may easily adjust activities and snap screenshots with a single press.
By learning these techniques, you can capture your screen in under a minute, allowing you to fully utilize the capabilities of your Apple device.
We hope this guide has given you the confidence to seize and share those critical moments. Stay tuned for more helpful tech tips and tricks to help you get the most out of your digital experience right here.
Frequently Asked Questions
1. How do I take a screenshot on my iPhone or iPad?
For iPhones:
- Press and hold the Side button (or Sleep/Wake button) simultaneously with the Volume Up button, then release them quickly. You’ll see a thumbnail of the screenshot in the lower-left corner of the screen.
For iPads:
- iPad with Face ID: Simultaneously press and release the Top (Sleep/Wake) button and the Volume Up button.
- iPad with Touch ID: Simultaneously press and release the Top (Sleep/Wake) button and the Home button.
2. Can I edit screenshots after capturing them?
Absolutely! After capturing a screenshot, tap the thumbnail preview to open it. You can then use the editing tools to crop, annotate, add text, or highlight sections before saving or sharing it.
3. How do I use AssistiveTouch to take screenshots?
AssistiveTouch is an accessibility feature that simplifies taking screenshots. To activate it, go to Settings > General > Accessibility > Touch > AssistiveTouch, and toggle it on. You can set up a custom action (like Single-Tap, Double-Tap, or Long Press) to take a screenshot within AssistiveTouch settings.
4. Where can I find the screenshots I’ve taken on my device?
After taking a screenshot, a thumbnail appears momentarily. Tapping this thumbnail opens the screenshot for preview. All screenshots are stored in the Photos app, in the “Screenshots” album or in the main camera roll, depending on your device and settings.
5. Can I share screenshots directly from my device?
Absolutely! Once you’ve captured a screenshot, tap the Share button within the screenshot preview. You can then share it via messages, email, social media platforms, or save it to cloud storage services like iCloud.
6. Is there a way to take screenshots without using buttons?
Yes, with AssistiveTouch enabled, you can perform various actions, including taking screenshots, without pressing physical buttons. Customize AssistiveTouch to execute a screenshot with a tap or a specific gesture.