So, you finally invested in a printer to make your life easy? Well, good for you! You will soon notice that your life will become easier and more productive with the use of modern printers. Gone are the days when you’d have to rely on an assistant or a printing shop to get your work done.
While buying a printer is a big job, there is no doubt that the thought of installing it can be daunting. However, it is not hard, not out of your league, and does not require a third party’s help.
So take a breath and have faith in yourself. You can now install your printer to a Mac with a few easy steps!
How To Install USB Printers
If you have a USB printer, then you don’t need to fret at all. Almost all that USB printers need is software updates on your mac to add a printer. Once that is done and out of the way, you can start the process of installing a printer on Mac.
If you’re the proud owner of the MacOS, then the job is already half done for you as it can detect the printer on its own and download any required software update. In fact, OS X includes printer drivers for most USB printers you can purchase this day. However, if you want to manually connect your printer, then follow the steps ahead:
- The first step is to update the printer software on the MacBook. You need to check the printer’s manufacturer and figure out if there are any available updates for your printer’s model.
- Now, it is time to prepare the USB Printer. Read the instructions guidebook to unpack the box in which the printer came.
- Add the Ink or Toner, whatever you may prefer. And, then attach the paper to the paper compartment as well.
- Switch the printer on and ensure that the screen is error-free.
- Once, you’re sure there everything is ready to run, attach a USB cable to both the computer and the printer. In case a message box pops up and prompts the ‘download new software’ alert, then follow the instructions to complete the process.
Voila! See? That wasn’t hard at all. However, it is important to mention here that if your Mac has one USB-C port availability, then make sure you’re using a multiport adapter. Once you connect your printer, go ahead and attach the USB-C cable to power. This simple step should extend the battery capacity of your device.
Your Mac should detect printers connected by USB on its own. Now select software update and download the required software
How to Install a Wi-Fi/ Network Printer?
Check the Wi-Fi network of your laptop and the printer. If they both have the same wi fi network connection, then you may not need to do any setup in order to use your printer. Pretty cool, huh? Let’s read more about it.
First of all, if you are having a hard figuring out how to get the information, tap File and then select Print. Now click on the Printer pop-up window. From here, you should be able to find your printer in the list of Nearby Printers or Printers and Scanners preferences.
However, on the odd chance, if the printer is not listed, you can attach a printer wirelessly by manually inputting details. Here’s how to do it:
- The first thing you need to do is to follow the standard approach mentioned above to check if your printer software on the Mac requires an update. Then, prepare your printer.
- Now, update the printer software on your Mac. You need to check the printer’s manufacturer while figuring out if there are any available updates for that printer model. However, skip this step in the case of an AirPrint printer.
- Now, have a look at the printer instructions on how you can connect to a network. So, if you own Wi-Fi printer, then you may need to use a USB cable to connect the Mac and the printer and then enable Wi-Fi printing.
- Once, the printer is connected, download a Mac software available with your printer. You can also avail a printer’s setup assistant and link the printer with the Wi-Fi’s network.
- When you’ve successfully completed the setup procedure, you can go ahead and remove the cable from both printer and the Mac. As it is a Wi-Fi printer, the Wi-Fi’s network will help your printer stay connected.
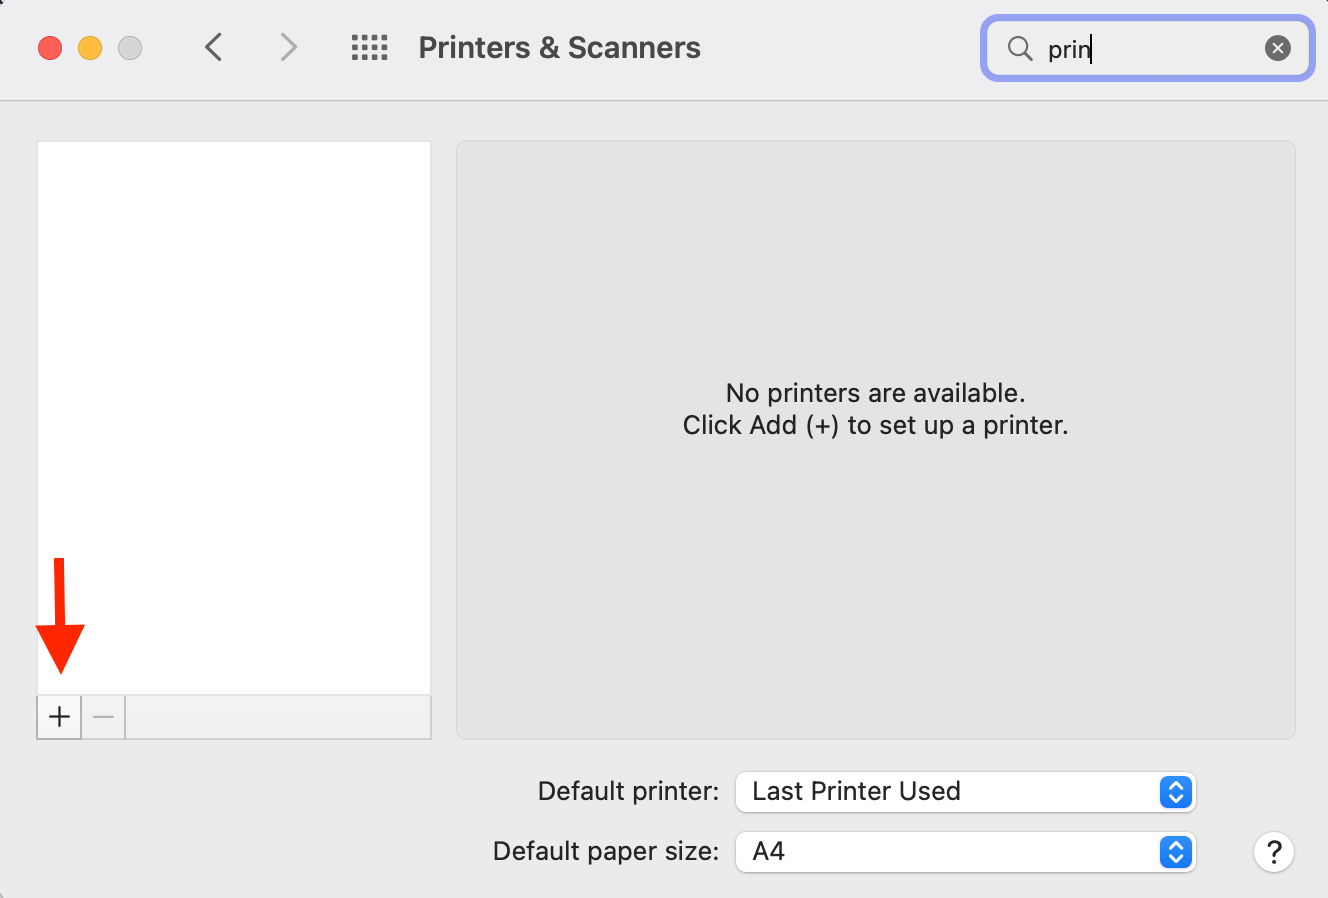
- Now is the time to add a printer to the document of accessible printers. You can do this by selecting Apple Menu. From here, go to System Preferences, and select Printers and Scanners.
- If you’re unable to locate your listed printer, find and click on the “plus” sign at the bottom.
 Now, you’ll be able to see a list of printer attached to a local network. If you don’t see your printer’s name right away, then don’t fret! Wait for a few minutes as requires some time for your Mac to recognize your printer.
 - Choose the printer as soon as you see it in the documents list and then click on Add. If a message box appears reminding of downloading a new software, then ensure that you complete the downloading process.
Depending on whether or not the printer show up in the top left corner of the list, you may need to add the printer’s IP address. The steps to do that will be mentioned in the next section of this article.
Before we go further, it is pertinent to let you know that after one adds a printer, macOS usually auto-select it if the printer encompasses special accessories, including extra papers, duplex units, or extra memory.
If your device is unable to detect it, then a dialog shows up that allows you to specify them manually. All you need to do is ensure that the customizations of the dialog precisely mirror the printer’s downloaded acessories for you to enjoy the full benefit of them.
How to Install Printer on Mac by Specifying Printer’s IP Address?
Let’s say that the printer one has to utilize on your Mac is appearing on the available printers list in the vicinity, then you can simply add the printer as a IP Printer.
However, for this to succeed, there is a pre-requisite: your printer should be capable of supporting these protocols, i.e. it should support AirPrint, Line Printer Daemon (LPD) HP Jetdirect (Socket), and the Internet Printing Protocol (IPP).
For this step to work out, you need to be aware of the printer’s IP address or hostname , the printing protocol, and lastly the model number or printer software name. If your printer has a different column, then it’s essential you have that as well. If you don’t have it, then you may need to reach out to the manufacturer.
It’s not difficult, so don’t be intimidated by this approach. Follow the steps ahead to get it done smoothly:
- First thing first — employ the standard approach as mentioned above to check if your printer software requires an update. Then, setup the printer to ensure that it is ready to get linked with Bluetooth.
- Once, your printer is prepared, add a network to it.
- Now, ‘add a printer’ on the already available printers list. To do this, select the Apple menu, then click on System Preferences. And, finally, click on Printers and Scanners.
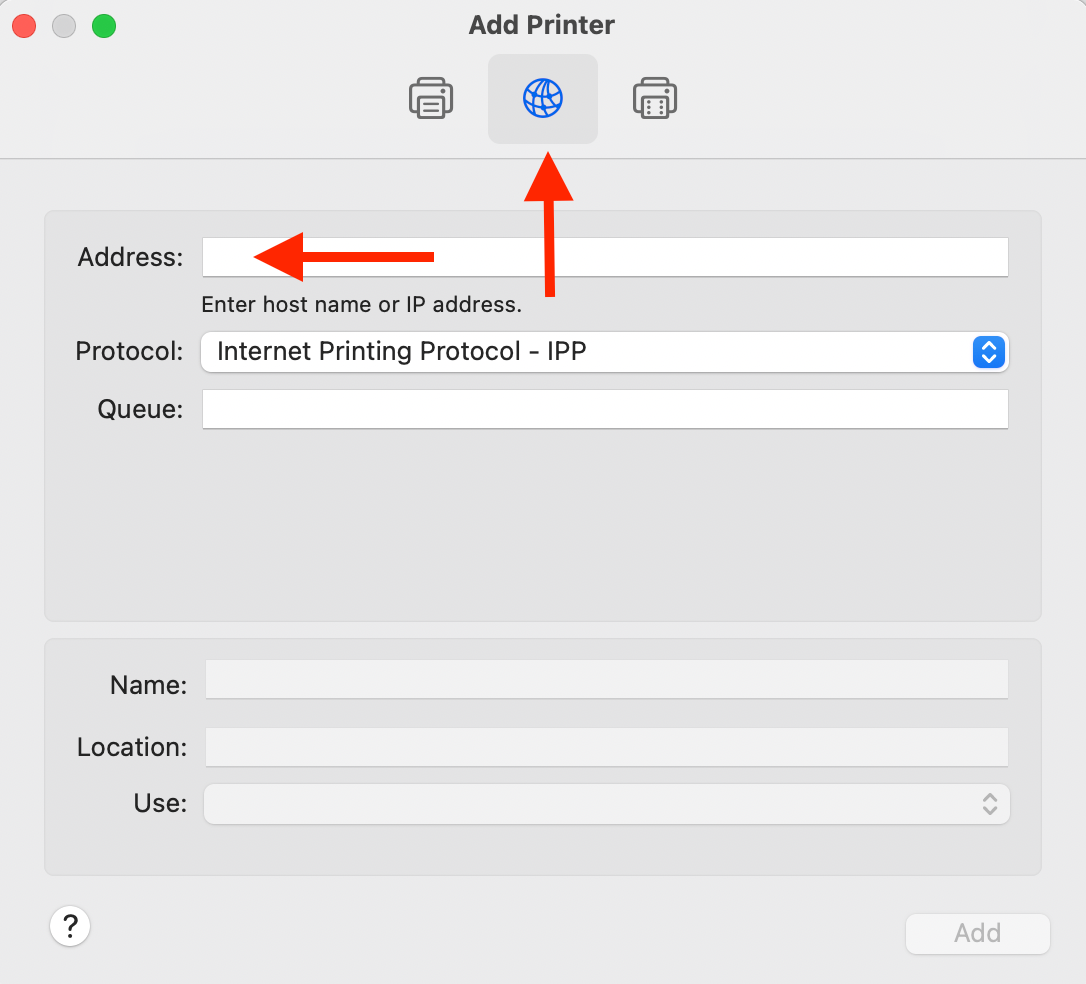
- Now, tap on the Add sign on the last of the list. Select IP icon in the IP tab, and enter the required information regarding the printer.

It is essential to note here that if you have used this general approach of specifying the IP address to connect your IP printer, it may not be fully functional. Also, keep an unused printer disconnected.
How to Install a Bluetooth Wireless Printer?
Here is some good news for those who already have Bluetooth installed on their Mac, plus have an adapter: they can now print wirelessly with the help of a ‘Bluetooth-enabled printer’.
If you want to add a Bluetooth wireless printer to a mac, then keep following the next few steps:
- The first step is the standard approach as mentioned above to check if your printer’s software requires an update. Then, prepare the printer and ensure that it is ready to get linked with Bluetooth.
- Now, it is time to increase the printer list by adding a printer. The simple way to add a printer is by selecting the Apple menu. From here, select System Preferences, and click Printers & Scanners. Finally, tap on the Add icon to add a printer, then select the Default option.
- Choose your printer from Printers list, then select Add. If your printer is not showing up , then you may have to type the name on search field and click on Return.Ensure your printer has a new age Bluetooth driver installed. Correspond with the manufacturer of your printer.
If you link your new bluetooth printer, a message may appear requesting about a new software download. So make sure that you complete the downloading process
How to Install a Wi-Fi/ Mobile Printer via System Preferences?
There are a few network printers that might need the users to download the configuration profile in order for the printer to appear on the network utilizing Airprint. But this isn’t particularly difficult to do.
If you have to install a profile or copy or download the printer’s profile on a Mac device, then you install it easily. Follow the steps ahead:
- First, you need to tap the profile twice and launch it on your Mac.
- As soon as the message pops up confirming whether you are interested to download the profile, tap on Continue.
- After an alert emerges requesting you to authenticate the desire to download the new profile, tap on Install. The new profile will then install in Profiles pane of System Preferences. After which one can add the printer to a printer list.
- Now, in order to add a printer in ‘printer list’, select the Apple menu.
- Open System Preferences and select Printers & Scanners.
- Select the Add icon, and from here you should be able to find a Default option.
- Choose printer (title: AirPrint Profile) in the Printers index, and tap on Add.
Now, if you still are unable to locate your printer on the record, then double-check if you have the latest profile downloaded. Also, do a quick check to see if there is a network path between the computer and the printer. You may have to correspond with the network administrator for a thorough update.
Wrap It Up
Now, see? It took a while, but don’t you feel a whole lot better about your new printer and yourself by installing it on your own. You can also customize default setting for multiple printers. Linking your printer to a mac is bound to make your work-life easy and productive. Just press command and P, to get a printout of your work. So kudos on taking steps toward it!
