The compatibility issues between Windows & NVIDIA graphics card seems to be a dime a dozen these days. However, the NVIDIA forum is flooded with complaints regarding the same from its users.
While installing the Nvidia graphics driver software, you’re probably getting the ‘Nvidia installer cannot continue’ error message. If so, you’ve bumped into the right place!
Today, we’ll discuss six ways to tackle the Nvidia installer cannot continue error on your Windows 10. So let’s dig in….
Solution 1: Make Sure Your NVIDIA Graphics Card Is Enabled (If Not, Let’s Enable It)
The quickest fix is to check if your Nvidia graphics card is enabled or disabled. Maybe, it is disabled, and that’s why you’re getting the error message.
Here are the steps to follow:
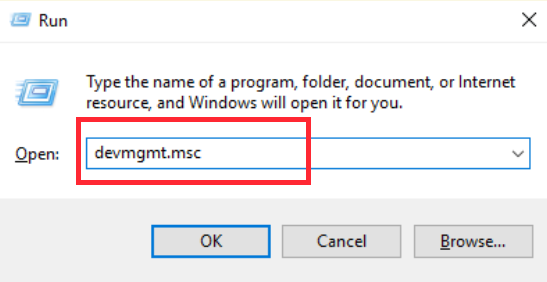
Step 1: Launch the Device Manager. To do so, Press Windows & R key at the same time.
Step 2: Type the command devmgmt.msc on the blank box and press Enter.
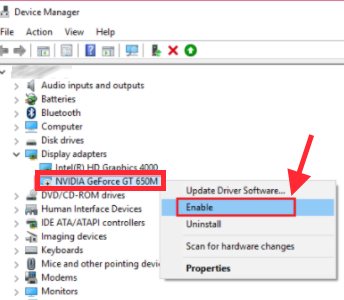
Step 3: From the device manager window that pops up, search for display adaptor(s). Once found, click on it to expand display adapters.
Step 4: You’ll be able to see the name of your Graphics card; make a right-click to check if the enable option is available.
Step 5: If so, your NVIDIA graphics card driver is disabled. Click to enable the NVIDIA graphics card.
Post enabling, close all windows, and restart Windows. Once done, try to install the Nvidia driver & check if the error pops up or not. If not, you’re good to go- else, keep reading!
Solution 2: Killing All Nvidia Processes
Another good reason you must be facing this issue is that the Nvidia processes are causing a conflict in the background. If so, killing all Nvidia processes and re-installing them might help solve the issue.
To do this, head on to the Task Manager window. Now, end all processes related to Nvidia. Post that, re-do the installation process.
Follow the step-by-step method below for a seamless execution:
Step 1: On your keyboard, press Ctrl + Shift + Escape buttons at once to launch the Task Manager.
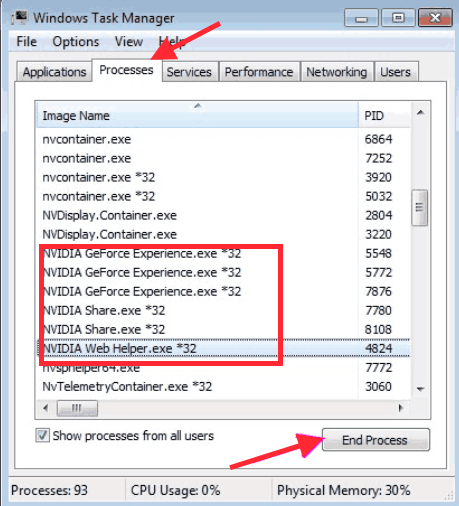
Step 2: Locate the Processes tab. Once you’re there, scroll down to see the list of all Nvidia-related ongoing background processes.
Step 3: Select each and click on the End Process button below, as shown in the image below. Keep repeating until you successfully kill all Nvidia-related background processes.
Step 4: Close all existing windows and reinstall the Nvidia driver once done.
Now, see if the error shows up. If the error doesn’t show up, pat yourself on the back. You’ve successfully unchained yourself from the misery- else, stick around a little longer!
Solution 3: Nvidia Graphics Driver Upgrade Needed
If the above solutions have failed, this might help you get rid of the issue. Unfortunately, 7 out of 10 times, it’s the culprit is an ‘outdated Nvidia driver.’
Follow these steps to update the Nvidia driver software:
Step 1: Once again, head on to the Device Manager window. ( Press Windows & X keys together > choose Device Manager)
Step 2: In The Device manager window, go to the Display adapters section by expanding its list. Here, click on the NVIDIA Graphics card option, then select the Uninstall device option.
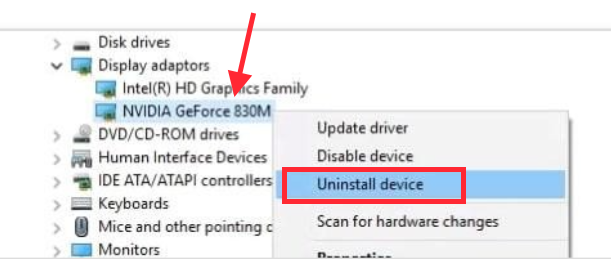
Step 3: Do not skip this step. Close all windows and restart Windows.
Step 4: Post reboot, repeat Step 1 & Step 2, but this time instead of clicking on the Duninstall device, look for the update driver option and click on it.
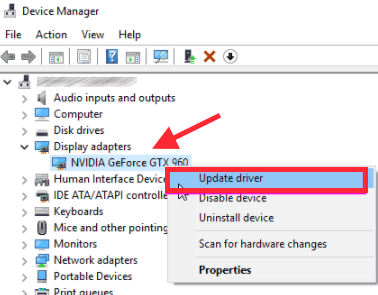
Step 5: You’re presented with an Update drivers screen when you click on Update Driver. Select the first out of two options (refer to the image below). Make sure you’re connected to the Internet for this step to work.
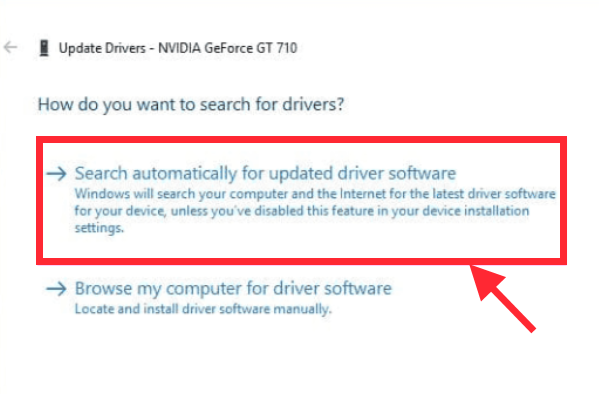
Step 6: Now, Follow the step-by-step on-screen installation instructions to update the Nvidia graphics driver on your PC.
Step 7: Close all tabs and restart your system when you’re through with the NVIDIA driver installation process.
Post reboot, try Nvidia driver installation and check if the cannot continue error still occurs. If you’re still facing the same issue, it might be because Windows cannot look for updated driver software. In that case, you need to install the NVIDIA GeForce driver manually.
Head on to the next solution to know how to install the display driver manually.
Solution 4: Nvidia Graphics Driver Manual Upgrade through Device Manager
To eliminate the Nvidia installer cannot continue error, we will be updating the Nvidia drivers manually from the Device Manager- in case Windows fail to search for updated drivers.
To do this, first, you need to head on to Nvidia| Official Drivers site. Next, you need to provide the necessary info related to your driver (refer to the image below) and select the green Search button.
Once you have successfully downloaded the appropriate latest driver from the list of Nvidia drivers, follow the step-by-step guide below to install drivers manually:
Step 1: And again, open up the Device Manager. (Press Windows + R keys both at the same time…)
Step 2: Also, once again, Locate the display adapters option in Device Manager, then click to expand the list. Look for the Nvidia graphic card option and make a right-click. Post that, choose the updated driver a.k.a, the first option.
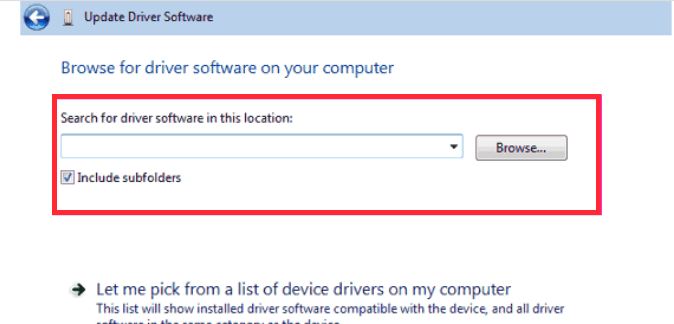
Step 3: You’ll be presented with a screen having two options, click on the second one (refer to the snippet below)
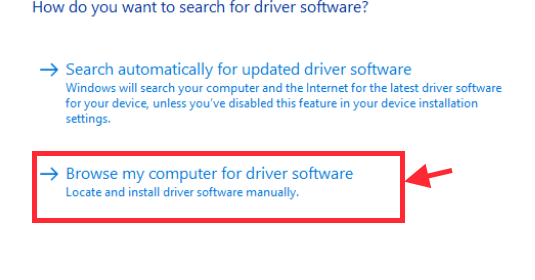
Step 4: Now, you will be provided with a browse option. Click on it to load the latest Nvidia graphics card driver, which you’ve just downloaded.
Once done, click on Next. Then you will have to follow the on-screen instructions to complete the Nvidia graphics card driver installation.
This should get the job done. Restart your system and try installing it again. If you’re still out of luck, do not fret. We have a couple more ways to fix this- stick around!
Solution 5: Installing Drivers By Fetching Device ID
Windows can detect Nvidia graphics cards incorrectly. If that’s the case, no wonder you’re being treated with the Nvidia installer cannot continue the error message.
The fix is: that you must manually input and fetch the Nvidia graphics card ID to your computer. Follow the chronology below:
Step 1: Open Device Manager once again on your PC.
Step 2: Also, once again, Locate display adapters in the Device Manager tool, then click to expand the list. Look for the Nvidia graphic card option and right-click on it. Now, select the Properties from the menu options of the Device Manager window.
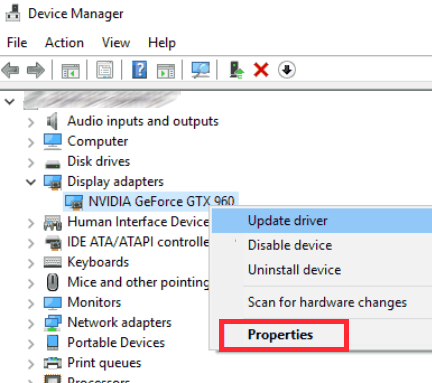
Step 3: Now, from the Properties box, go to the Details tab. You will be welcomed with a value box. (refer to the snippet below)
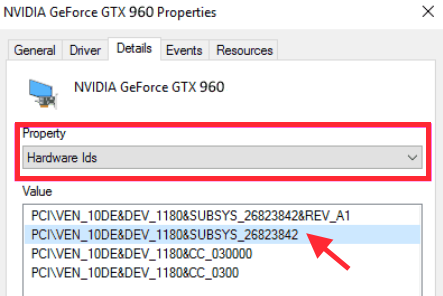
Step 4: You see mostly numbers and the initials VEN & DEV on every line, known as the vendor and device code, respectively. In the snippet below, you can see the Vendor Code is 10DE and the Device code is 1180.
Step 5: Next, you need to head on to devicehunt website to download the NVIDIA graphics card driver by providing the VEN & DEV code. Once you’ve provided the necessary inputs, a download drivers link will be provided.
Step 6: Post downloading from the links, and install it on your computer following the Solution 4 method.
Once the driver has been installed, restart your Windows and install the NVIDIA graphic card again to see if this solves the issue.
If not, we still have other ways to do it….. don’t lose hope; keep scrolling!
Solution 6: Uninstall All Things Nvidia & Attempt Re-Installation
By far the easiest method of all. Sometimes all we need is a classic uninstall and re-install to get rid of the Nvidia installer cannot continue error. So, we will be uninstalling everything related to Nvidia from the system and doing a fresh installation.
Step 1: Scroll up to Solution 3 and follow the first three steps to uninstall the Nvidia graphics card driver from the system.
Step 2: Press the Windows key and search for Add or Remove programs option from the menu.
Step 3: Click on the option to head to the Programs & Features window. Now, uninstall everything one-by-one with Nvidia written on it.
NOTE: You may have to reboot the system multiple times during this, but it’s worth it!
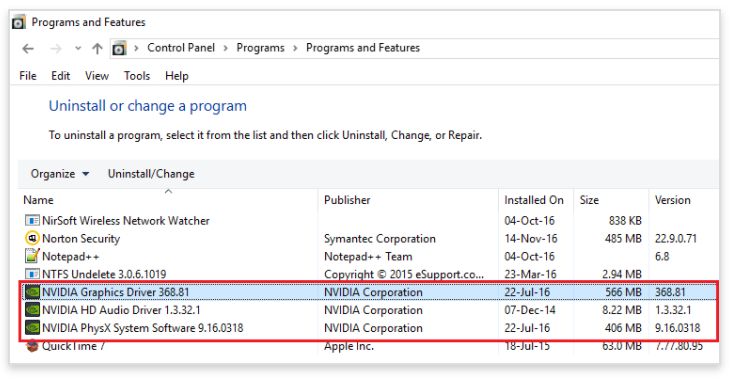
Step 4: Once you’ve removed all things Nvidia, attempt a fresh Nvidia graphics card driver installation.
This must do the trick for the NVIDIA driver; if not- keep scrolling for more!
Solution 7: Renaming the Nvidia Folder from the Program Files Folder
Renaming the NVIDIA Graphics Card folder may not be the best solution- but it works like a charm in some cases. Don’t be shy to try it out!
Step 1: In your My PC folder, open the C drive and the folder named Program files.
Step 2: Inside the Program files folder, you will easily be able to locate the NVIDIA Corporation folder. When the NVIDIA folder is found, make a right-click.
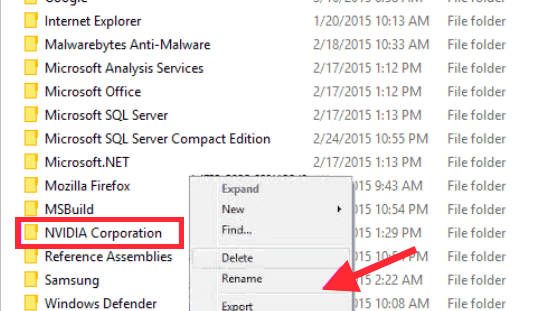
Step 3: Choose a different name from NVIDIA Corporation to rename the Nvidia folder. We recommend you rename something related to Nvidia corporation so that you can find it up later.
Post renaming the NVIDIA folder, try reinstalling the Graphics again on your PC, and see if this works!
Solution 8: Try Disabling The Anti-Virus
Antivirus software is infamous for causing a hindrance to installing many software services. So your antivirus might be forbidding the Nvidia graphics card to function correctly.
You must disable the antivirus protection if you get the Nvidia installer cannot continue the error.
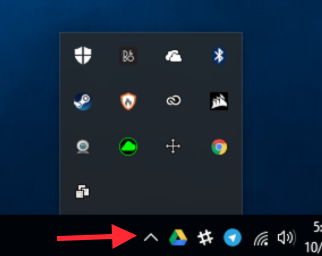
On your PC, open up the System tray and look for the antivirus installed on your computer here; go ahead and disable it. To do so, you can make a right-click on its icon and select Disable or Exit option.
Then, follow the steps below:
Step 1: Click on the Start menu on your PC. Here, type taskmgr. Locate the Task Manager option in the search results and click on it. Alternatively, you may right-click on the taskbar and launch the Task Manager window).
Step 2: Head on to the Processes tab. Try and locate your Antivirus services running in the background. Select the processes, then make a click on the End Process option available at the bottom-left of the window.
Step 3: Post that and install the Nvidia graphics card. If you’re still getting the Nvidia installer and cannot continue the error, restart your PC. Then, again, retry the Nvidia installation process.
IMPORTANT NOTE: The Antivirus must be paused only for the graphics driver installation. Once done, feel free to resume all Antivirus processes again.
If you have reached this far, we are sure you have made it. Your queries like:
- How to solve Nvidia installer cannot continue?
- Nvidia installer failed to fix
- How to enable my Nvidia graphics card?It should have been answered by now.
Final Thoughts
By the time you’re reading our last words, hopefully, we have helped you solve the Nvidia drivers issue responsible for the Nvidia installer cannot continue error. Kudos for your patience! Running Nvidia processes repeatedly by our instructions calls for immense calmness and composure- and we did it together!!
We’re pretty sure that one of the eight solutions discussed is sure to solve your Nvidia installer cannot continue issue. However, if you’re still facing the same NVIDIA drivers issue- all that’s left is to get in touch with customer support and allow them to have a look for an advanced Nvidia installer fix!
