
When it comes to taking pictures, everyone takes blurry ones sometimes, whether it is a fast-moving object, shaky arms or that the camera is out of focus. Sometimes, you can just retake the shot and the issue is gone, but there are many situations where it is impossible to recapture it.
What if you come back from a holiday, to check your pictures and that one picture you were most excited about and wanted to preserve for a lifetime is blurry! At this point, you’ll think that the moment is gone and cannot be recreated.
However, before giving up and putting that photo in the trash, there are a few things you can try to make it better and cherish that moment for a lifetime. In this article, we will provide you various solutions to address blurry photos that you can try.
1. How to Unblur a Photo Using Adobe Photoshop
Adobe Photoshop is without a doubt one of the best photo editing programs out there. The best thing about Photoshop is that you will not have to put much effort into fixing the issue, as you can unblur images on Photoshop in a semi-automated process. There are two ways to fix blurry images using Photoshop.
Using Shake Reduction in Photoshop
The Shake Reduction filter in Photoshop helps to reduce blur caused by camera motion, be it linear motion, zig-zag motion, arched motion or rotational motion.
How to use the automatic camera shake reduction:
Step 1: Open Photoshop.
Step 2: Go to File > Open.
Step 3: Select the blurry photo which you want to fix on your computer and click Open.
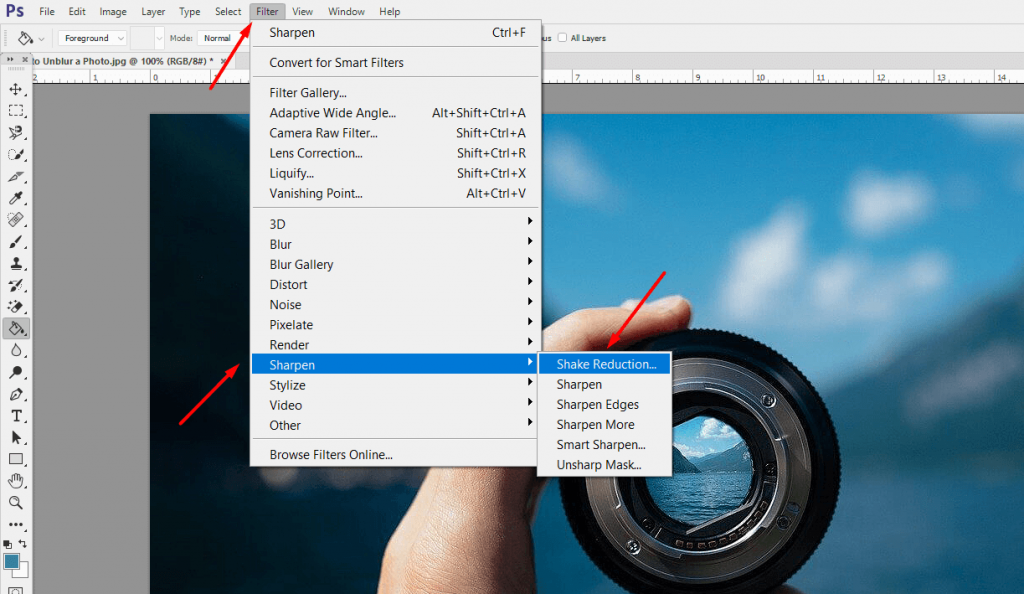
Step 4: From the top menu list, go to Filter,select Sharpen.
Step 5: In the Sharpen menu, select the Shake Reduction option.
Once you have selected “Shake Reduction”, your part is done. Now, photoshop will do its work by analyzing the picture, checking the type of blur and the area of the picture that needs to be corrected. Once done, it will show the adjusted picture.
See if the result provided by Photoshop is satisfactory. If not, you can give the next method a try.
Unblur Photo in Photoshop by Adding Extra Layer
This method to unblur photos in Photoshop photo editor is best suited for pictures that are blurry because of camera focus issues. It does not have much impact on blurriness caused due to camera shakes or motion.
How to use Extra Layer in photoshop to unblur a picture:
Step 1: Open Photoshop.
Step 2: Go to File > Open
Step 3: Choose the blurred photo on your computer and click Open.
Step 4: On the pane on the right-hand side under the Layers panel, right-click on “Background”, select Duplicate Layer,name it copy1and click Ok.
Step 5: Now, right-click on the copy1 and again select Duplicate Layer, similarly name it copy2.
Step 6: Now select the last layer created, i.e copy2 from the layer panel.
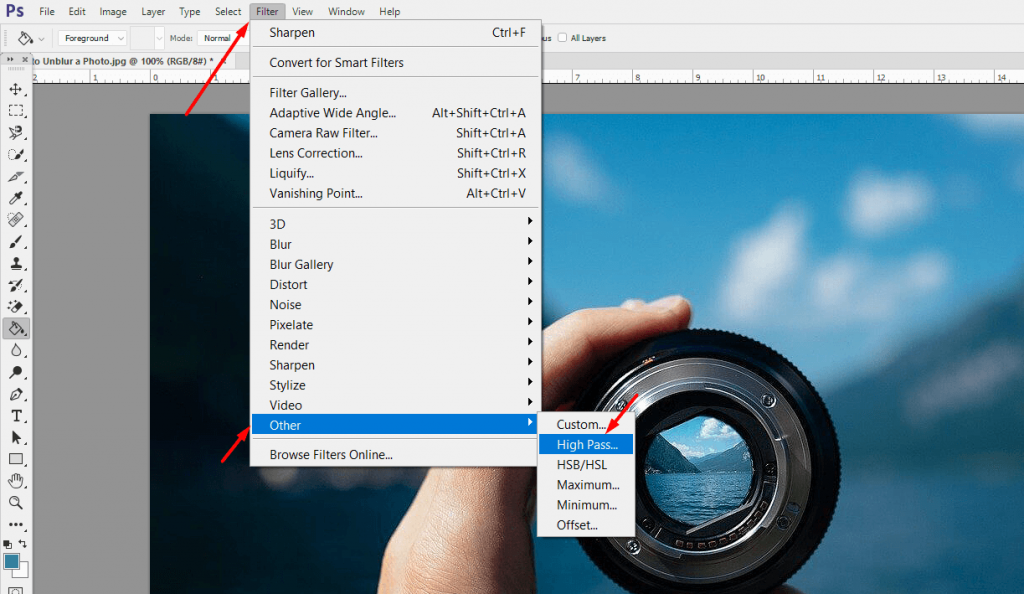
Step 7: Click on Filteron top of the photoshop window and go to Other > High pass
Step 8: Once the High Pass window opens, input the value of Radius as 10 pixels and click Ok.
Step 9: Select copy1now and click on Filter > Other> High Pass
Step 10: This time set the Radius value as 5 pixels and click on Ok.
Step 11: Now Click on copy2and select Soft Lightfrom the dropdown just below the layers tab with normal as the pre-selected option.
Step 12: For copy1select Hard Light.
Once you follow the steps mentioned above, you will be able to substantially sharpen an image. If you are satisfied with the result, go ahead and save the processed image on your PC.
Tip: You can always get additional help on how to use Adobe applications from Adobe Help Center.
Photoshop is licensed software and can be purchased from the Adobe Creative Cloud app catalogue. The good news is that you can get a 1-week free trial, which might help you save that one picture! However, if one thing or another is stopping you from making use of Photoshop, there are simpler options at your disposal. Let’s check them out.
Licensed and free software for unblurring photos
Bonus: At the end of the article, I will also share a few ways to avoid blurred pictures in the first place, because, as the saying goes “Prevention is better than cure”!
2. Unblur Photos in GIMP
GIMP is an open-source photo editor loaded with loads of functions and tools, just like Photoshop. Unlike Photoshop, it is absolutely free to use. Use this software on your Windows or MAC device to unblur a photo by following these steps:
Step 1: Open the photo you want to deblur in GIMP.
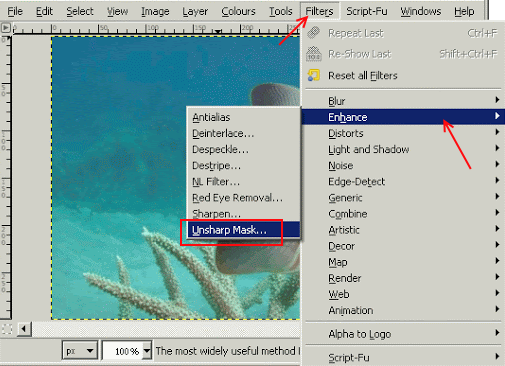
Step 2: Go to FIlters > Enhance and select the Unsharp tool.
Step 3: Use the Radius, Amount, and Threshold sliders of the tool and adjust the sharpness of your image to fix the blurriness.
Step 4: Once satisfied with the result, save the image to your PC.
3. Deblur Photo on Android / iOS devices using Snapseed
Snapseed is quite a popular image editing app for Android as well As apple devices such as iPhones, iPads and iPods. Using the features of this editing tool, you can unblur a photo quite easily. The Snapseed tool for this process is called Details. Here are the steps to follow to deblur photos using this photo editing tool:
Step 1: Open Snapseed in your Apple or Android device and load the blurry photo that you want to unblur.
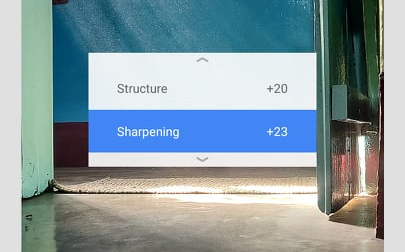
Step 2: From the editing tools, select the Details option. There, you will get two options to adjust Structure and Sharpen the image. Adjust both sliders one at a time until you reach the desired result on the loaded image.
Step 3: Once done, simply save the final result to your device.
4. Use Blurity to Unblur Photos
Blurity is photo editing software specifically designed to fix blurred images available for both Windows and Mac OS. You can download it from the Blurity website directly and it is also very easy to install and use. Moreover, you get a free tutorial to fix blurry images once you install the application on your PC.
Blurity is free to use but there are limitations to the free version. The drawback is that the deblurred photos will be produced with watermarks. If you want to remove the watermarks from the pictures, you will have to purchase the software’s one-time registration at a nominal price.
How to unblur a photo using Blurity:
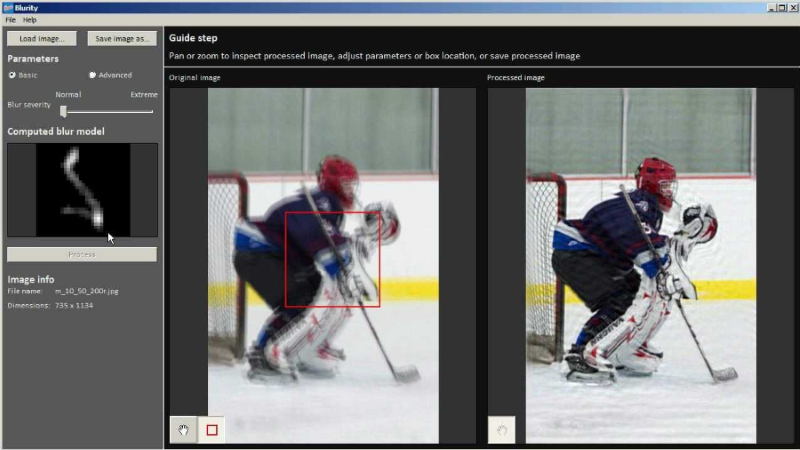
Step 1: Open Blurity and click on “Open Image”
Step 2: Select the desired image which you want to deblur and click Open.
Step 3: Once the image is open, click on the portion of the image where you need to fix the blur.
Step 4: Now, click on the “Process” button.
The application will take some time to process your image, then you will get to preview the original photo on the left panel and the processed photo on the right panel of the Blurity user interface. You can save a copy of the processed photo to your PC. Simply go to File and click on Save As.
Let’s check out the next absolutely free way to fix photo blur.
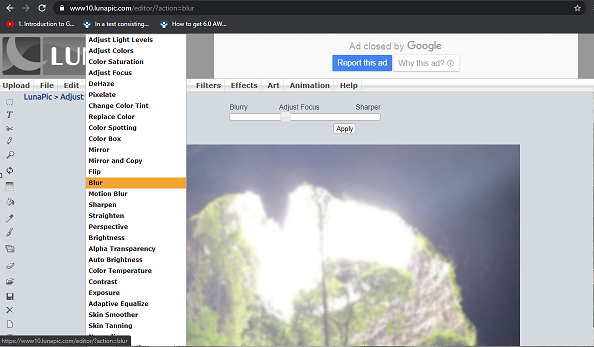
5. Using LunaPic to Unblur a Picture
LunaPic is an online photo editor that can be used to make your pictures look better. You do not have to install any software or plugin in order to use this editor. All you need to do is open the website, upload the picture that you want to edit on LunaPic, and carry out the editing you want to. You can also open an image from the web directly by using its URL.
How to unblur picture using Lunapic:
Step 1: Open Lunapic Website on any browser.
Step 2: Click on Upload > Choose File. Select the photo from your PC to deblur or you can directly upload an online picture using Open from URL option.
Step 3: Once the picture has been uploaded, click on Adjust and then go to Blur.
Step 4: You will see a bar to adjust the picture blur: drag the adjustment bar to the right towards Sharper.The more you drag the button to the right, the sharper your image will appear. However, this is not just a regular sharpen tool.
Step 5: Once you have adjusted the bar satisfactorily, click on Apply to apply the deblur setting on the photo.
Hopefully, you’ll find the applications and instructions outlined above useful. As promised earlier, below are a few tips to avoid blurry pictures in the first place.
Blurred Image due to Camera Focus Issues
One of the most common causes of blurry images for non-professional photographers is camera focus. Nowadays, most smartphones and digital cameras have an autofocus function built-in. However, this can be a problem when the device focuses on the wrong object in the frame rather than the main object.
To avoid this issue on your DSLR or digital camera, you just have to point the camera directly at the object and then press the shutter button halfway down. This helps the camera to focus on the object which is at the center of the frame.
There are many smartphones that have an in-built lock focus feature. You can always click on the desired object and lock the focus there and get a good picture. Not all phones have this advanced feature. In some phones, you can just manually focus on the object and remove autofocus. However, some phones have camera software that does not allow to manually focus. In this case, you can zoom in and out and move the camera until it focuses on the correct object.
Blurred Image due to Shaky Arms
This type of blur comes from holding the camera with shaky hands. These days, digital cameras and smartphones have in-built anti-shake software, which reduces the risk of a blurry image even if your hands and consequently your device is shaking. For devices that do not have this feature, a tripod or a table can be used to capture a stable picture. Additionally, a Bluetooth shutter button comes in handy for taking pictures from smartphones when you cannot manually press the capture button on it.
For a very distant object, you can capture the photo in a larger shot and then crop out the object from a full resolution uploaded photo.